|
- Read all instructions carefully before starting.
- Cut along INSIDE of template line. Locate on roof carefully. Be
certain to avoid ribs, braces, and electrical wiring.
- Trace template outline on roof. Drill a starter hole in each corner.
Avoid defacing headliner inside the vehicle. Instead, stop your drill
bit short of the headliner. Then, using an ice pick or a nail, push
through the headliner thus identifying the location of the headliner to
be cut away from the inside.
- With headliner section removed, use a metal cutting sabre saw to cut
around the perimeter of the vent opening you traced on the
roof.
- Insert roof vent into opening to determine if it fits cut-out
properly. If not, cut out opening as needed. With roof vent properly
fitted to opening, use a center punch to mark the location on the roof
for the vent frame mounting screw holes.
- Remove vent from the roof and drill all screw hole locations with a
1/16" pliot hole
NOTE: If installing a power or lighted vent, provide power
source of 12 volts DC., using 18 gauge wire.
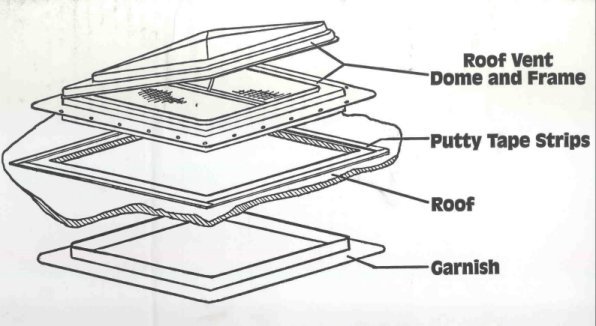
- Using putty tape from Elixir Vent Installation Kit #5690, place putty
strips around rough opening on roof 1/2" (1.27cm) from edge of rough
opening. (Be sure putty strips cover entire area to be sealed.) Use
double layers of putty strips if necessary to seal ribbed
areas.
- Insert vent in rough opening on top of putty strips. Use an awl or
nail to locate and line up corner drilled holes with the corner screw
holes in vent frame.
CAUTION: Install vent with lid hinge side toward front of
vehicle.
- Using screws from Elixir Vent Installation Kit #5690, drive corner
screws first to hold vent in place while driving all remaining vent
mounting screws. Tighten just enough to compress putty tape.
Over-tightening may cause Plastic Base vents to crack.
- Using the appropriate roof coating for your roof surface, coat screw
heads and vent frame edge with Elixir PLAS-T-COTE Roof Coating.
- Install garnish from lnside,of vehicle and your Installation Is
complete.
|